Friday, June 30, 2006
READER CREATES CHICKEN IN MUSTARD SAUCE
Another reader creates chicken in mustard sauce. Thanks for the picture Lindsay :D To get the recipe, look to the right and go under the June archive. 
Friday, June 23, 2006
BREAKFAST - EGGS AND FRENCH TOAST
Not my best photographic work, but I was still in the process of cooking so I had to hurry and take the picture... This is the breakfast I made for Father's day. I didn't know what to buy my dad, so I had to resort to cooking... again. Fortunately for me, I love making breakfast (although I'm not very fond of eating it) and wanted to try a couple of recipies that I developed while I was away from home.
I got the idea of putting sour cream in eggs from Ralphie Cifaretto, the guy who was killed off by Tony in the fifth season of the Sopranos because of a dead horse. Ralphie was actually cooking scrambled eggs with sour cream right before Tony attacked him. Sad for Ralphie, even sadder for the eggs that never got eaten...
I think Ralphie used milk and sour cream in his eggs but I prefer to use just sour cream, otherwise its a little too watery for my taste. I made an omelet for my dad's breakfast, but I also made scrambled eggs for my mom and I think that tasted better. So here is a recipe for scrambled eggs... Feel free to switch up the ingredients: ham, different types of cheese, green onions, yellow onions, tomatoes, mushrooms... There is one thing you must do, however, and that is to make sure you honor Ralphie's life by using the sour cream. Otherwise, he might as well have not lived at all.
SCRAMBLED EGGS, RALPHIE CIFARETTO-STYLE
Have Ready:
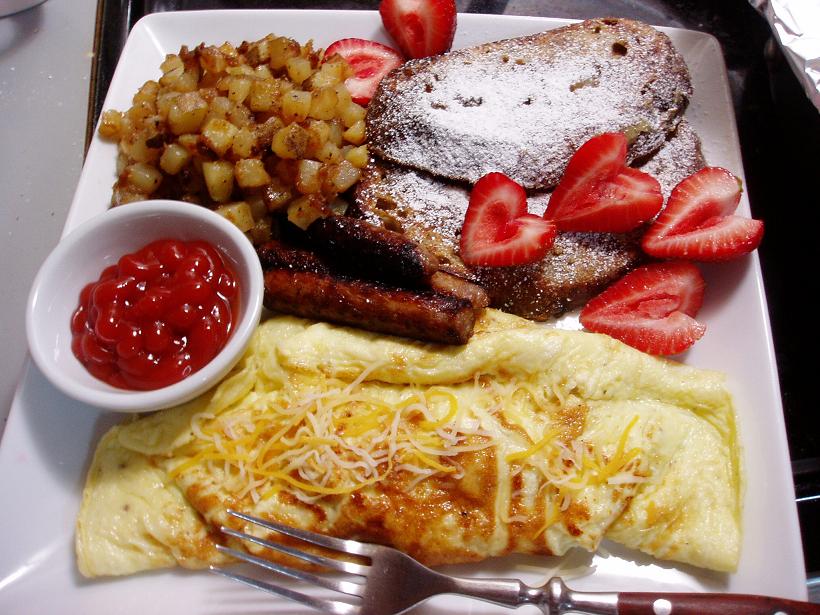 This is the breakfast I made for Father's day. I didn't know what to buy my dad, so I had to resort to cooking... again. Fortunately for me, I love making breakfast (although I'm not very fond of eating it) and wanted to try a couple of recipies that I developed while I was away from home.
I got the idea of putting sour cream in eggs from Ralphie Cifaretto, the guy who was killed off by Tony in the fifth season of the Sopranos because of a dead horse. Ralphie was actually cooking scrambled eggs with sour cream right before Tony attacked him. Sad for Ralphie, even sadder for the eggs that never got eaten...
I think Ralphie used milk and sour cream in his eggs but I prefer to use just sour cream, otherwise its a little too watery for my taste. I made an omelet for my dad's breakfast, but I also made scrambled eggs for my mom and I think that tasted better. So here is a recipe for scrambled eggs... Feel free to switch up the ingredients: ham, different types of cheese, green onions, yellow onions, tomatoes, mushrooms... There is one thing you must do, however, and that is to make sure you honor Ralphie's life by using the sour cream. Otherwise, he might as well have not lived at all.
SCRAMBLED EGGS, RALPHIE CIFARETTO-STYLE
Have Ready:
- 2 eggs
- 1 tablespoon sour cream
- 1 teaspoon chopped chives
- 1 tablespoon grated cheddar cheese
- salt and pepper to taste
- 1 teaspoon butter
Add butter to nonstick pan and heat on medium high. In bowl, scramble eggs with sour cream. Once most of the sour cream has been incorporated into the eggs, season with salt and pepper. Add chives and grated cheddar. When pan becomes hot (make sure butter doesn't brown) add eggs. Let sit for a few seconds then begin to scramble. Cook to desired doneness.
* * *
The first time I can remember making french toast, although I'm pretty sure I had made it before, was about two years ago. It was the morning after a house party and my friend being the gracious host that he is, bought lots of eggs and Texas toast-style bread so that everyone could have breakfast in the morning. I made eggs and french toast for everyone with the ability to wake from their drunken slumber, and I guess it was a hit because it now proudly bears the name "crack toast." Originally I used thick slices of bread (Texas toast) and milk, but I've slightly modified the recipe after watching an episode of Good Eats. Hopefully my drunk friends will still approve.
CRACK TOAST (slightly modified)
Have ready:
- 3 eggs
- 1 cup half and half
- 2 tablespoons brown sugar
- 1 tablespoon white sugar
- 1 teaspoon cinammon
- 1 teaspoon vanilla
- pinch of salt
- Loaf of eggy bread (challah or brioche), rustic bread, or Texas toast
- butter for frying pan
- powdered sugar or maple syrup (optional)
Bread contains a lot of moisture within its crumb, and since it has to soak up a lot of liquid its best to let the bread dry out overnight. To do this, just leave the sliced bread uncovered on a plate before you go to sleep.
Heat oven to 375 degrees. In bowl mix eggs, half and half, brown and white sugars, cinammon, vanilla and salt. Pour into a shallow pan. Place slices of bread into custard mixture, preferably two at a time. Let sit for two minutes then flip over so that the other side gets coated with the custard. Heat frying pan on medium heat and add enough butter to coat the pan. When the butter begins to sizzle (take care not to brown), add bread to pan. When the bread turns golden, flip and brown the other side. Remove the french toast from pan and set on baking sheet. Continue to coat bread in custard and cook in frying pan until all the custard is used up. When all the french toast is placed on the baking sheet, place it in the oven and bake for five minutes. Remove from oven and sprinkle with powdered sugar or serve with maple syrup.
Thursday, June 15, 2006
MY TRIP TO SEATTLE
I wait for the ferry... Its another cloudy day in Washington.
Sitting in front of the window at Dahlia bakery, owned by Seattle chef Tom Douglas. They had cupcakes, coconut cream pie bites, coconut macroons (only in the display case, I guess they were sold out), pain au chocolat (chocolate croissant), and a variety of cookies, breads and sandwiches. My sister bought me a roast beef sandwich on french bread and a mini lemon meringue pie. A lady asked if she could take a picture of the bakery with us sitting in front of it. I giggled like an idiot as she snapped the photos... The mini lemon meringue pie that's still sitting in the fridge... I wasn't hungry for it after I ate my sandwich so it sat in a hot car for a few hours. I'm not a fan of lemon meringue, but I had to get it because it was cute.
 The view from my sister's boyfriends house. If you don't know, that's the Space Needle in the background. After dinner, we sat around watching Oprah while her boyfriend played World of Warcraft. There was something oddly familiar about that whole situation...
 My sister and her boyfriend outstide the restaurant we ate at that night. I had chicken fajitas and they ordered some sort of shredded pork taco thing.


Sitting in front of the window at Dahlia bakery, owned by Seattle chef Tom Douglas. They had cupcakes, coconut cream pie bites, coconut macroons (only in the display case, I guess they were sold out), pain au chocolat (chocolate croissant), and a variety of cookies, breads and sandwiches. My sister bought me a roast beef sandwich on french bread and a mini lemon meringue pie. A lady asked if she could take a picture of the bakery with us sitting in front of it. I giggled like an idiot as she snapped the photos...
 The mini lemon meringue pie that's still sitting in the fridge... I wasn't hungry for it after I ate my sandwich so it sat in a hot car for a few hours. I'm not a fan of lemon meringue, but I had to get it because it was cute.
 The view from my sister's boyfriends house. If you don't know, that's the Space Needle in the background. After dinner, we sat around watching Oprah while her boyfriend played World of Warcraft. There was something oddly familiar about that whole situation...
 My sister and her boyfriend outstide the restaurant we ate at that night. I had chicken fajitas and they ordered some sort of shredded pork taco thing.
Tuesday, June 13, 2006
RED BEANS AND RICE
 1. Sweat garlic, onions, celery and bell pepper in oil until garlic and onions become translucent. Add thyme, cayenne and black pepper. If using bacon, cook before adding vegetables. Use bacon greese instead of oil to sweat vegetables.
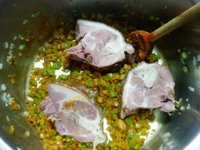 2. Add smoked neck bone or smoked ham hock (pictured)
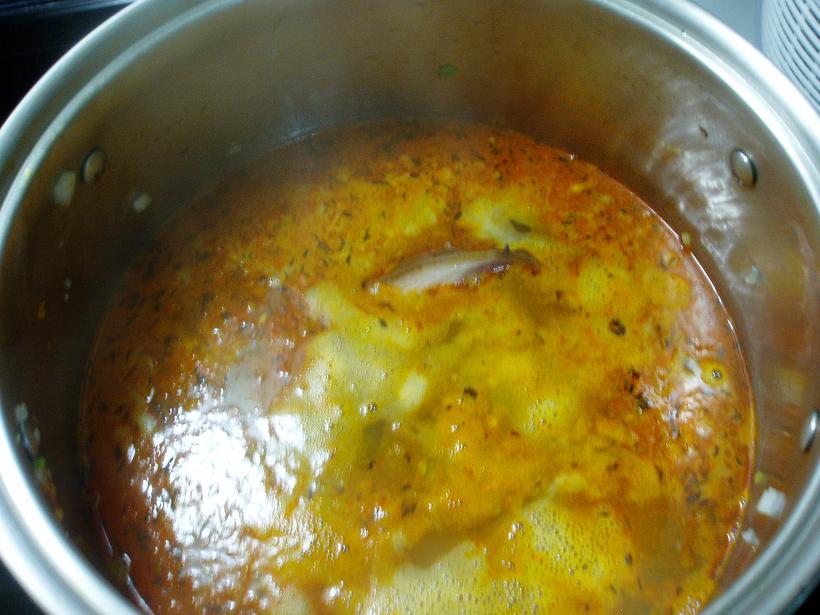 3. Add enough water to cover contents of pot.
 4. Simmer until water is reduced by about half and pork meat becomes tender. Remove pork from pot, set aside to cool. Add beans to pot and continue to simmer. Once ham hock/neck cools, remove the meat from the bone, shred and add to pot. Keep cooking over low heat until there is only enough liquid to barely cover contents of the pot (as pictured).
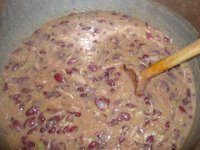 5. Mash half the beans against pot with a wooden spoon. It should have the consistency of stew. If it seems too watery, keep cooking over low heat until some of the water evaporates and the beans become thick (make sure to keep stirring, because once mashed, the beans will burn easily). Adjust seasonings and serve with rice.
This recipe is nothing fancy, but makes for a pretty good side dish. I think it goes well with fried catfish and a piece of homemade cornbread. You can add as little or as much cayenne as you'd like... Just remember, cayenne is VERY spicy so add in a little at a time or you might find yourself choking down a gallon of water or even worse... sitting on the toilet for days.
I've made this dish a couple of ways, a couple of times with the pork neck and bacon and once with just the ham hock. While the ham hock yields more meat, I have to say I think it tastes better with the neck bone and bacon. The ham hock has a lot of fat, so if you're going to use it remember to skim off the grease that floats to the top of the pot.
Have ready...
2 cans red beans
1 smoked pork neck bone or smoked ham hock
3 piece of bacon (cut into 1/2" pieces)
1/2 c each onion, celery, bell pepper (1/4" dice)
1 clove garlic
1 teaspoon dried thyme
1 tablespoon cayenne
salt and pepper to taste
In a large pot, over medium heat, cook bacon. Once most of the fat has rendered out of the bacon, add the onion, celery, bell pepper and garlic. Cook vegetables until onions become translucent. Add thyme and cayenne and mix with the bacon-vegetable mixture. Put neck bone into pot and add enough water to cover entire contents of pot. Turn heat on high. When the water begins to boil, turn heat down to a medium low (the water should be simmering). Cook for about an hour and a half, taking care not to let too much of the water evaporate. Add more water if necessary. Remove neck bone from pot, but continue to keep pot of vegetables on heat. With a fork, remove meat from neck bone (there won't be much of it). Add meat to pot. Season to taste with salt, pepper and cayenne (if necessary). Add red beans and cook until beans are heated through. If it seems that there is a lot more liquid than beans, continue to cook until some of that liquid evaporates. With a large spoon, mash half the beans in the pot. Season to taste. Serve with rice.
Sunday, June 11, 2006
Sunday, June 04, 2006
HERBS 101 - CILANTRO
FRESH CILANTRO, ALSO MAY BE REFERRED TO AS CORIANDER
In the fajita chicken recipe, posted below, it calls for cilantro. Now I know some people (wink, wink ;D) while at the supermarket may have trouble asking, say, a nearby old lady about which herb to buy. After minutes of debating whether or not to ask her, you decide against it out of fear that she would think you were too cute and would want to engage in conversation with you. You go home empty handed, and now have to live with the fact that you just prohibited your chicken fajita meat from living up to its full potential. Not that I know of anyone that this has happened to, but to prevent future "situations" such as this, I present to you- Herbs 101.
Cilantro is an herb that grows from the coriander seed and may be refered to as Chinese parsley or coriander (I know, in Germany, that is what they label it as). Don't mistake it with flat leaf parsley, the two look very similar. If you should get confused, smell it. It will be very fragrent with kind of a lemon-limey undertone. If the scent seems familiar to you, its probably because you've had it in in salsa or another Mexican dish. Cilantro is also used widely in Thai cuisine, and I often used to see it in Indian curry (I miss you Bombay...).
To use cilantro, simply remove the leaves from the stem (the thin pieces of stem are okay, but you don't want to use the thicker stems) and chop with a knife. You don't want to chop herbs way in advance, because they tend to turn brown.
CHICKEN FAJITA NACHOS
Top tortilla chips with cheese, fajita chicken w/onions, lettuce, tomato, avocodo, sour cream and salsa I don't know if you can really call this "fajita" chicken... There are probably certain requirements that have to be met to be considered a fajita, and just adding some "Mexican" flavors to chicken and then frying it up in a pan probably won't meet those requirements. A lot of things I cook are probably not very authentic so please don't be offended if what I make is far from what its supposed to be. That being said, I think this chicken is pretty good. If I was authentic fajita meat, I would be jealous of this chicken.
My favorite way to eat this chicken is fried up with onions, red and green bell peppers and served with warm tortillas. Since we had no tortillas in the house, I decided to make nachos.
For chicken fajita meat, have ready:
 I don't know if you can really call this "fajita" chicken... There are probably certain requirements that have to be met to be considered a fajita, and just adding some "Mexican" flavors to chicken and then frying it up in a pan probably won't meet those requirements. A lot of things I cook are probably not very authentic so please don't be offended if what I make is far from what its supposed to be. That being said, I think this chicken is pretty good. If I was authentic fajita meat, I would be jealous of this chicken.
My favorite way to eat this chicken is fried up with onions, red and green bell peppers and served with warm tortillas. Since we had no tortillas in the house, I decided to make nachos.
For chicken fajita meat, have ready:
- 1 cup olive oil
- Juice of 1 small lime
- 1/2 cup chopped cilantro (read HERBS 101, above)
- 2 cloves minced garlic
- 1/2 small sliced onion
- 1 teaspoon cayenne (or more if you like it spicy)
- my secret ingridient... 1/2 a pack of Old El Paso taco seasoning mix (Everything doesn't have to be completely from scratch, now does it?)
- salt and pepper (to taste)
- 2 boneless-skinless chicken breasts, cut into strips
Put everything, but the chicken, into a bowl. Mix well. Add the chicken to the marinade, making sure that every piece is coated with the mixture. Let the chicken marinate in fridge for at least half an hour. When ready to cook, set stove on high. When pan becomes hot add in the chicken and marinade (no need to add oil to pan, because there is plenty already on the chicken). Cook until done. Serve as fajitas or on nachos (see below).
For nachos:
Set oven on broil (to cook from top) to the highest setting. On an oven-proof plate, spread chips evenly. On top of the chips, sprinkle a layer of cheese (I like Sargentino's four-cheese Mexican blend). Place plate in oven, under the broiler. Once cheese has melted, remove plate from oven (be careful, it will be hot) and top with fajita chicken and some of the sauce it cooked in. Top with lettuce, tomato, avocado, sour cream and salsa.
For fajitas:
Cook chicken the same way as exlained above, but half way though add sliced red and green bell peppers. Finish frying it up until the chicken is cooked through and peppers are tender. Serve with warm tortillas*, cheese, sour cream and salsa.
*Note: To warm tortillas, set a frying pan on the stove and set on medium heat. Once pan becomes hot, place on one tortilla for 10-20 seconds or until warm. Flip over and heat for another 10-20 seconds. You can also heat them in the microwave, but I don't think they taste as good that way.
Saturday, June 03, 2006
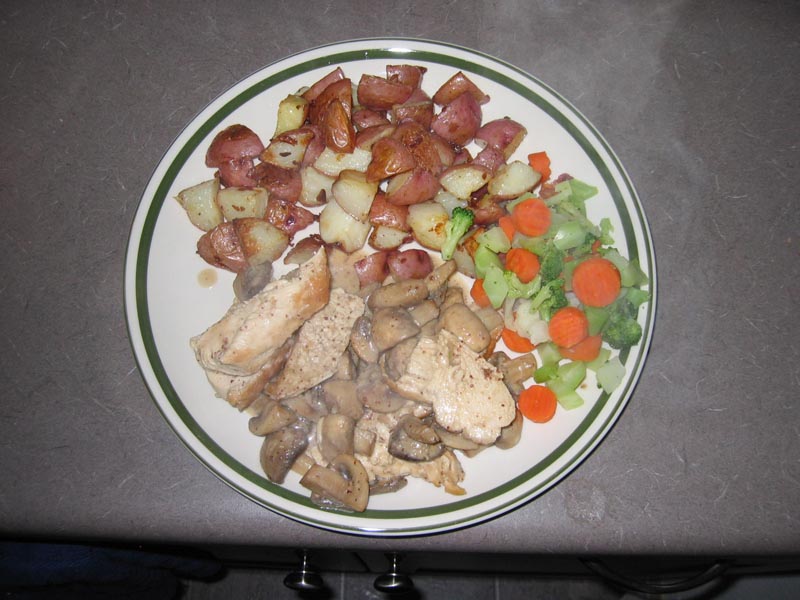
A READER COOKS CHICKEN IN MUSTARD SAUCE
A picture of the chicken in mustard sauce (recipe below) a reader ;D created. Looks better than mine...
.jpg)
Friday, June 02, 2006
TONIGHT'S DINNER
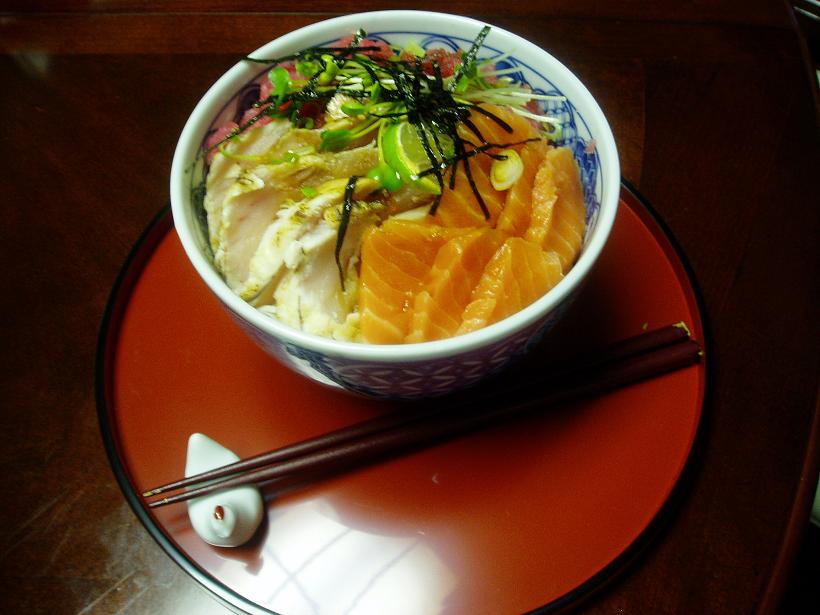
Albacore tuna sushi is one of my favorite things to eat. Slightly creamy in texture with a flavor more subtle than that of Ahi (Yellowfin) tuna, the flavor is enhanced by charring the outside. This plate, made by my mother, is served (to me :D) with green onions and a light ponzu* sauce. Simple, yet amazing.

*Ponzu is a citrus flavored soy sauce that can be found at many Asian grocery stores. If you can't find it, create your own by adding a little bit of lemon juice and rice vinegar to plain soy sauce.
CHICKEN WITH CREAMY MUSTARD SAUCE
 Prepare the ingridients: whole grain dijon mustard, sour cream, chopped parsley, chopped shallot, quartered mushrooms, chickenbreast (seasoned w/salt & pepper), chicken broth, olive oil and butter(not pictured).
To achieve a flavorful and golden crust on your chicken, heat olive oil in a frying pan (preferably stainless steel, not non-stick but either will do) on medium-high heat. When the pan becomes hot place chicken breast smooth side down in pan. At first it will seem like the chicken might stick to the pan, but it won't (When the chicken is ready to be flipped over, it will let you know). Let the chicken sit in the pan, undisturbed, for a good three to four minutes to achieve a nice golden crust. At this point, the chick can be easily flipped over.
Slice chicken and top with creamy mustard sauce. Serve with garlic roasted potatoes and asparagus

Have ready:
- olive oil
- 2 chicken breast halves (seasoned w/salt & pepper)
- approximately a 1 to 1-1/2 cups of chicken broth
- 1 tablespoon butter
- 3 handfuls of quartered mushrooms (I used crimini, but you can use white button mushrooms)
- 1 tablespoon finely chopped shallot
- 1 tablespoon whole grain mustard (grey poupon country dijon works for me)
- 2 to 3 tablespoons sour cream
- 1 tablespoon chopped parsley
Add approximately 2 tablespoons of olive oil to frying pan, turn stove on medium-high heat. When pan becomes hot, add chicken (smooth side down) and let sit for three to four minutes or until a golden crust forms (see picture above). Flip chicken over and let cook for three more minutes then add chicken broth. Cover and continue to cook on medium heat until chicken is cooked through (internal temperature of chicken should be at least 175 degrees). Take care not to over cook, chicken breast will aquire a texture similar to that of shoe leather if it sits in a pan to long. I can't really give you an estimated time on how long it takes to cook, because the size a chicken breast and stove temperatures may vary. However, if the chicken is firm and the juices run clear when you poke it with a knife, your chicken should be ready to slice. If you slice into the chicken and its still raw, no need to worry. Continue to slice the entire breast then add back to the pan and finish cooking. Remove chicken from pan when finished. There should be broth remaining in the pan. Put broth into a bowl and set aside.
Have stove on medium-high. In the same pan (without washing) that chicken was cooking in, add butter. Once butter has melted, add mushrooms and cook until slightly golden. Add shallots, cook until translucent. Add to the mushrooms the chicken broth that you had set aside. Simmer until only about half a cup of broth remains. Add mustard, stir well. Stir in sour cream and continue to simmer until sauce has thickened. To tell if the sauce is thick enough, run a spoon down the center of the pan. If the sauce remains in place and doesn't immediately cover the area you ran your spoon through, it is ready. Add parsely to sauce. If you find that the sauce is too salty, add a little more sour cream. Top sliced chicken with sauce. Serve with your favorite side dishes.
Thursday, June 01, 2006
SEARED STEAK
You don't have to go to a fancy restaurant and empty out your bank account for a good filet mignon (beef tenderloin). I recently went to supermarket and bought two six ounce steaks for $8. Now, considering that most steak dinners will set you back at least $20 ($28 at the bistro I once worked at), I would say that its definitely worth trying to cook a steak on your own. It's not hard at all :D
Have ready:
Have ready:
- 2 six to eight ounce portions of beef tenderloin (they are usually already cut and sold in 6-8oz portions)
- olive oil
- course salt (kosher or sea salt) and freshly ground black pepper
Heat oven to 375 degrees. Place a couple sheets of paper towel on a plate. Set the steaks on the paper towels and, using another paper towel, dab off execess moisture. Throw away paper towels and set steaks on plate. Generously sprinkle salt and pepper on both sides of the steaks. Coat steaks with olive oil. Heat frying pan on medium-high heat. Once the pan becomes very hot, add the steaks. Let sit for 2-3 minutes or until the steak has formed a nice brown crust. Flip over and cook for another 2-3 minutes. Transfer steaks to an oven proof dish and finish cooking in the oven for approximately five minutes (this should give you a medium-rare steak*). Remove steaks from oven and set on plate. Let rest for five minutes so that the juices are given time to redistribute throughout the meat. You can now serve this with herb butter (see below) OR spend an extra couple of minutes to create an easy and delicious pan sauce (see below).
* If you're really particular about the way your steaks are cooked, buy a meat thermometer...
120-125 degrees for rare (very pink center)
130-135 degrees for medium-rare (pink center)
140-145 degrees for medium (slightly pink center)
CHOOSING THE RIGHT THERMOMETER
Meat thermometer on the left, candy thermometer on the right. Meat thermometers may be smaller than the one pictured, but it will always be slender unlike the candy thermometer.
If you're going to purchase a meat thermometer, make sure you don't accidentally pick up one intended for creating candy (otherwise known as a candy or deep fry thermometer). Meat thermometers are slender and will only read up to 220 degrees farenheit, unlike candy thermometers which are fat and read up to 400 degrees farenheit. If you think you can kill two birds with one stone by buying a candy thermometer and using it for both meats and confections, good luck trying to prod a steak with the dull tip.
Oh, and a bit of advice... DO NOT PUT THE THERMOMETER INTO THE OVEN! The top part of most meat thermometers are made of plastic but my mom unknowingly stuck it into a turkey and put it in the oven. The only thing the thermometer was able to tell her was that 350 degrees is the perfect temperature for melting plastic.
PAN SAUCE
Red wine and shallots add flavor and depth to the sauce
People tend to throw their pans into the sink after cooking a steak. What they don't realize is that they just threw the makings of a good sauce down the drain. Just a couple of steps and you can make an ordinary steak into something not-so-ordinary. Buy a decent red wine and use it for both the sauce and to serve in a wine glass with dinner. Shallots are usually found next to the garlic and onions in the produce section.

People tend to throw their pans into the sink after cooking a steak. What they don't realize is that they just threw the makings of a good sauce down the drain. Just a couple of steps and you can make an ordinary steak into something not-so-ordinary. Buy a decent red wine and use it for both the sauce and to serve in a wine glass with dinner. Shallots are usually found next to the garlic and onions in the produce section.
Have ready:
- 1 tablespoon unsalted butter
- 1 cup quartered button mushrooms
- 1 tablespoon chopped shallot
- 1/4 cup dry red wine (burgundy or merlot is good)
- steak drippings (there should be some in the oven-proof dish that you cooked the steaks in and also the plate where the steaks are resting)
- 1 tablespoon cold herb butter (or 1 tablespoon unsalted butter and chopped herbs)
Turn stove on to medium high heat. In the pan you seared the steak in (don't wash the pan!), add the tablespoon of unsalted butter. Once the butter is melted, add mushrooms. Let the mushrooms sit in the pan for a minute or two without stirring, you want them to get a nice brown crust. Add shallots. Stir mushrooms and shallots around and cook until they have a golden brown color, taking care not to burn the shallots. There should be little bits of brown stuck to the bottom of the pan (from the beef and mushrooms). Pour red wine in the pan and scrape the bottom of the pan with a wooden spoon(the bits stuck to the pan helps flavor the sauce). Cook until the wine is slightly thick and syrupy (the wine will reduce to about half of what it was). Add any and all dripping from the steak to the mushrooms. Once the sauce is bubbly, remove from heat and add herb butter. Keep swirling the pan around until all the butter is incorporated into the sauce. Season with salt and pepper (if needed). Serve with steak and mashed potatoes.
Subscribe to:
Comments (Atom)

